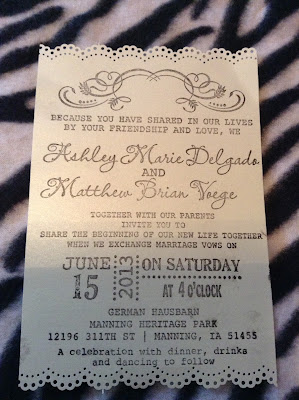
First off here is where I had my inspiration. Found this on Pinterest and decided I'd give it my own spin.
Here was the finished product:
First off I used this mint pearl paper (The one thing the fiancee got to pick out, haha!). I had it custom cut, I believe the dimensions were 4 7/8th x 7 3/4th. You need it a bit longer than what it should be to take in account the lace edge cut. We punched the paper using this Martha Stewart Lace Edge Punch. Yes KMart! Gotta get those reward points! haha.
Next we stamped the invite wording. I got these wonderful custom made stamps made from Love To Create Stamps on Etsy. I also bought the ink pad from him - I would suggest getting some extra ink to refill it as well. We ran out and had to buy more at Walmart. It was not the same quality ink and it smudged a lot more!
Next for the RSVP card. We used the extra invite cards and cut them down ourselves to 3 1/2 x 5. We used another Martha Stewart Lace Edge Punch for these.
Again we used a custom stamp for the wording.
I also had a return address stamp made, and used these for the mailing address for the 4-bar envelopes we got. The great thing is that the address stamp is a self-inking reusable one! And it just says our first names so it can be used well after we're married! Well.. until we move that is!!
Now for the filler paper, I typed them up on the computer using word. I made and rotated the text box sideways to get the words to run along the side. I found a great tutorial on how to make your own map for the invites and followed that. Again I had the paper pre-cut, this time to 6 5/8th x 4 1/2. I shaved off an extra 1/2 inch off the direction cards so that they would layer.
As you can see I also made some QR codes for the maps and our wedding website! We love technology and I thought it was a neat touch. Others may find them ugly or tacky - so it's up to you! But here's the website I used to make the QR codes. I then saved the images and added them to the word doc.
Lastly I docked the invites inside the pocketfold. I bought some adhesive dots from Paper and More as well to do this. then I just stuffed them all! Make sure you put a stamp on the RSVP envelope!! Lastly I finished it off with a little jute twine.
I opted non-traditional and printed my envelopes. Again I used Word and some downloaded fonts. I trying to mimic the invite font the best I could!
Well I hope that was informative! We opted for a lot of the recycled colors - But Paper and More has tons of colors to choose from! You could easily replace the jute twine with some ribbon and go for a completely different theme! Also, these cost me in postage one regular stamp, plus 20cents extra. I had them weighed twice! The first time they said one stamp was enough, but somehow they gained weight before they actually mailed off.


What font did you use for your names in the invite?
ReplyDelete**on
ReplyDeleteSorry for the site reply! I didn't do the font on the invites they were a custom made stamp from an etsy vendor, so I'm not sure!
ReplyDelete